Contents
STARUNION WUING 160PDD Electric Bike Brake Lever With LCD Display User Guide

Prologue
Dear users, in order to make you better operate the electric vehicle, please read the instrument specification of the 160PDD carefully before use. We will tell you in the most concise language every step of the use of the instrument, including from the hardware installation and settings to the normal use of the instrument, and help you to solve the possible confusion and obstacles in the use of the process.
Product introduction
- Product Name and Model
Brake handle assembly with instrument Model:160PDD
- Product brief introduction
- The appearance and structure design style is novel, the integration of instrument and brake function is the first in the
- Wide Angle display, 1.3〞LCD-FSTN screen display is good.
- IP65 Waterproof and dustproof performance.
- Compatible with major UART protocols, the instrument can be switched between a variety of protocols for better
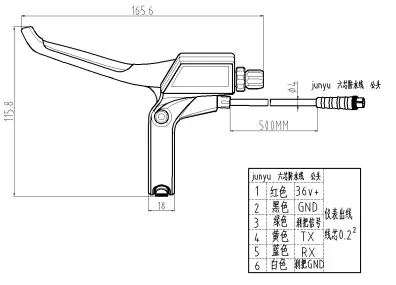
Appearance and Dimensions

Instrument coding rule
Instrument regular order production batch number
| Batch No | Voltage Values |
| Sign | Implication |
| Production of date/month/year | 24v、36v、48v Conventional voltage value, or other unconventional voltage requirements as defined by customer order |
20XX-XX-XX————production of date/month/year
Instrument SN Program software numbering rules
| Instrument software
code |
Model | The client code | Software version | |
| Chara
cter |
Implication | Implication | Implication | Implication |
| WXRJ | The WUXING
software |
Instrument Model | Abbreviation of the client’s company name | Software version serial number |
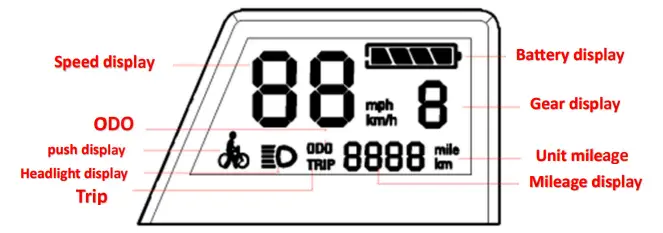
Display interface
Specification parameter
①:Power supplies:DC 24V/36V/48V
②:Rated Current:15mA~25mA /36V ,Electric door lock output:MAX100mA@(19V~54V)
③:Screen Specification:1.3 inch LCD(FSTN)
④:Communication mode:UART(Default Star union protocol)
⑤:Working Temperature:-20°C~ 60°C
⑥:Storage Temperature:-30°C~ 75°C
⑦:Protection grade:IP65
⑧:Service life of key:>0.05 million presses
⑨:Power off starting distance:2~6 meter
⑩:Switch contact life:≥0.1 million times
⑪:Brake handle resistance to tension:≥450N
⑫:Mechanical life of brake handle≥0.1 million times
Functions overview
①:Three buttons, easy to operate.
②:Kms and miles toggle options.
③:Mileage display:Trip(TRIP)、Total(ODO).
④:6KM/H Power promote.
⑤:Power Mode Selection.
⑥:Level 4 electric quantity indicator.
⑦:Headlight prompt.
⑧:Fault code prompt.
⑨:Power off brake handle function.
Wiring definition
Product Operation Instructions
①Loosen brake handle lock screw, slip into the left handlebar(Standard handle pipe specifications: Φ22.2 ), adjust to an easy position, install the brake handle instrument into the horizontal pipe, use a
5MM inner hexagon wrench, lock the M6 setting screw. Instrument damage caused by excessive torque is not covered by the warranty
②Connect the brake handle instrument outlet connector with the controller butt connector according to

Key definition Gear to adjust:M; Headlight key: ; Check information:
ON OFF
Keep the normal connection state between the instrument and the controller. When the key is turned on, the instrument will display the boot interface. Then it will normally enter the basic interface and start working;
When the key is turned off,the instrument power off.
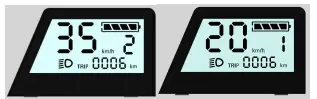
Power gear switch Short press the M key,
switch power gear,change the power mode,total 1-2 mode states:The default mode of the instrument is 2.(The selection interface of power gear is shown below)
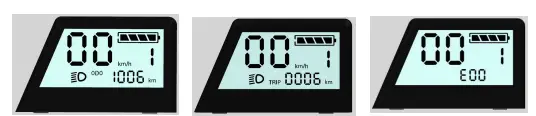
Display switch when the machine is on,
Press the enter key can switch TRIP 、ODO and Fault monitoring loop display:Total(ODO)->Trip(TRIP)->Fault Monitoring(E00)。The mode switching interface is shown below:
Headlight switch
Short press the key , open headlight(Controller support is required),instrument display interface, the headlight indicator icon lights up,short press the key again,close headlight,headlight indicator icon goes off .

Battery Indicator
When the battery power is normal, according to the change of the battery capacity, the power display is divided into 4 grids. When the battery power reaches the under-voltage warning value, the last panel displays flashing, which reminds the user to charge immediately. The battery level is shown below:

Battery Capacity(C) percentage and power display icon The corresponding table shows±0.5Verror allowed.
| Number | Battery Percentage | Battery display | 36V | 48V |
| 1 | C≤8% | U≤30.5 | U≤39.0 | |
| 2 | 8%<C<30% | 30.5≤U<32.0 | 39.0≤U<42.0 | |
| 3 | 30%<C<52% | 32.0≤U<34.5 | 42.0≤U<45.0 | |
| 4 | 52%<C<75% | 34.5≤U<37.0 | 45.0≤U<48.0 | |
| 5 | C≥75% | U≥37.0 | U≥48.0 |
User Settings
General setup items:Backlight Brightness、Voltage Settings、Gear power value、Wheel diameter information、Number of magnets、 Speed limit information,and so on. (Other Settings items are
associated with the controller or are set by default, based customer requirements for open user settings options. If the instrument is not working normally due to the wrong adjustment of some parameters, adjust each parameter back to the default value)
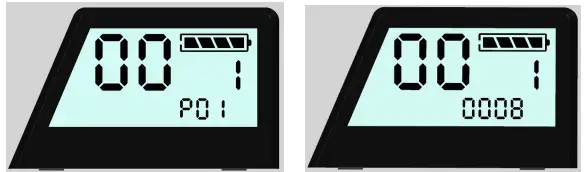
Entering
Under the boot interface,Press the M and the key at the same time for 3 seconds to enter the Settings,press the key to enter setting parameters,press the M or the key to adjust the parameters, press the key to return to the previous interface.
Backlight brightness settings
After entering the setting interface, the mileage position will display P01,press the key to view the backlight brightness value, Factory Default:8. Display Range: 0-9. 0 indicates turning off the backlight。
Voltage settings
Enter the setting interface and switch to P03,press the key to view voltage mode,Factory Default:48V. Display Range: 24/36/48; unit:V(The controller does not care about the values issued)
Voltage settings
Enter the setting interface and switch to P03,press the key to view voltage mode,Factory Default:48V. Display Range: 24/36/48; unit:V(The controller does not care about the values issued)
Gear power settings
Enter the setting interface and switch to P05,press the key to view the value of the gear,press M key to switch gears to view the output value of the corresponding gear position,press the key to adjust the required output value. Factory Default:the output value is 15 when the gear position is 2, the output value is 8 when the gear position is 1; Display Range:1-15.
Wheel diameter settings
Enter the setting interface and switch to P08,press the key to view the wheel diameter setting,(the wheel diameter)Factory Default:100 means10.0 inch Display Range: 1.0-50.0,unit:inch(Controller association)
Magnetic steel number settings
Enter the setting interface and switch to P09,press the key to view the magnetic steel number setting,Factory Default:30 . Display Range: 1-255,unit:grain(Controller association)
Speed limits settings
Enter the setting interface and switch to P10,press the key to view the speed limit value setting,Factory Default:128
Display Range: 0-255 Speed factory default:Reach max speed when the gear position is 2, the speed of gear position1 is 20Km/h. (Controller association)
Exit Settings
Press the M and the key at the same time for 3 seconds to exit the setting mode after completing the setting.
Questions and answers
● The instrument cannot start up properly
Check whether the wiring is correct, check whether the plug-in is installed in place. Check whether the power output is normal.
● The instrument has trouble code.
Carry out repairs to the electric vehicle maintenance site in time.
● The speed indicated by the instrument does not accord with the actual speed.
Check whether the wheel diameter magnetic steel setting is consistent with the real car
Malfunction Indicator
When the function of the vehicle is lost or the vehicle cannot run normally, the fault code of the instrument can be inquired to analyze and monitor the cause of the current fault of the vehicle.
Tap the key twice to see the fault code and analyze the cause
Malfunction Display
Mileage position is displayed E00~E09 under the fault view interface (E00 indicates no fault in monitoring)
Malfunction code and analysis
| Fault Code | Fault description | Troubleshooting |
| E01 | The instrument does not receive data from the controller or the data received is incorrect. Communication Fault | 1: Check whether the TX/RX communication line is connected correctly. 2: Check whether the wiring harness and connectors are loose or broken. 3:Check whether the instrument communication protocol matches. |
| E02 | The controller could not receive the data of the instrument or the data received was incorrect. Communication Fault | |
| E03 | Controller Fault | Check Controller |
| E04 | Hall fault of Motor | Check Motor |
| E05 | Motor phase loss fault | Check Motor and Controller |
| E06 | Turn brushless | Check Shifters |
| E07 | Brake handle fault | Check Brake handle |
| E08 | Power sensor fault (for moped only) | Check sensor |
| E09 | The motor is under voltage protection | Charge and check the battery status |
Cautions
★Do not hit the LCD window area, so as not to crack the LCD screen or shell crack water or leakage, pay attention to the safety of the instrument.
★Try to avoid the use in bad weather conditions, heavy rain, snow and sun exposure.
★The instrument can not be plugged and unplugged when the power is on, so as not to cause the instrument to burn out.
★Instrument can not be soaked in water, so as not to cause water short circuit. The instrument should not contact the fire source to avoid melting of the plastic shell, cracking of the LCD screen and environmental pollution. be connected at will to avoid burning out.
★When the instrument cannot be used normally, it should be repaired in time.
五Quality commitment and warranty scope
- After the instrument leaves the factory, the shell and wire scratches, damage and fracture are not covered by the
- The instrument is burnt out due to the wrong connection of the customer’s wiring, which is not within the
六Description of file version changes
|
version |
Creation Time |
Change Statement |
Editor |
Auditor |
Approver |
| V1.0 | 2019-10-06 | Liu Jinqian |
This instrument guide manual is from JIANDE WUXING BICYCLE Co., Ltd 160PDD-v1.0 common software setup version,according to the customers’ specific vehicle actual setting shall prevail.