![]()

Wall box selected by vlovo cars
Copyright and trademarks
Copyright 2024 eSystems MTG GmbH
All rights reserved.
Subject to availability and technical modifications.
All hardware and software names used are trade names and/or registered trademarks of the relevant manufacturers:
Issued by: 01/2024
Revision: 3.0
Contents
YOUR Wallbox
With permanently connected charging cable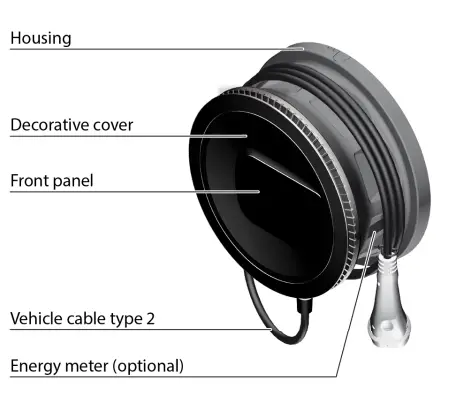 With socket
Front Panel
About this document
To perform all the steps described here, the Wallbox must be fully configured and ready for operation. For information on this, see the Assembly and installation instructions. For further information, see Additional information.
Charging a vehicle without authentication (Free-Charging)
No approval is required. Connect the charging cable and charge: This is the default factory setting.
Prerequisites
- Charge level LED (2) is lit in white.
- Operating / error status Led (1) is lit in white.
- If the LEDs are not lit, briefly press the button (1).
1. Only for version with socket:
Plug the charging cable into the socket on the Wallbox.
2. Plug the charging cable into the vehicle connection. - The charge level LED (2) initially pulses white while vehicle identification is in progress.
- When the charge level LED (2) is pulsing green, the charging process has been started successfully.
- When charging is complete or the vehicle is fully charged, the charge level LED (2) is continuously lit in green.
3. If an error occurs, fix the error as described in the operating instructions.
| Display | Error type |
| Charge level LED (2) is lit in red. | Charging error |
| Operating / error status LED (1) is litin blue, yellow or red. | General error |
Connecting to the Wallbox using the web app
Follow the steps below to use the web app:
- Keep the access letter to hand.
- Find the list of available WiFi devices on the laptop, tablet or smartphone.
- Select the Wallbox from the list of available WiFi devices using the WiFi code (SSID) from the access data letter.
- Establish a connection with the selected Wallbox.
If a connection could not be established, see Assembly and installation instructions, section Commissioning: No connection to web app established via WiFi. - Enter the WiFi password for the Wallbox (network key) from the access data letter.
- When the connection has been established successfully, open the web browser.
- Enter the host name of the Wallbox from the access data letter in the address bar. The login area is displayed in the web app with a login option.
 Note
Note
When accessing the web app, the web browser may display a warning stating that the page poses a security risk or that a secure connection cannot be established (depending on the browser). Depending on the web browser, the “Advanced” button can be used to enable access to the web app via an additional button or link. - Select standard user as the user role.
Note
System settings can only be made as the Service user, see operating instructions. - Enter the password for the standard user (from access data letter).
After a successful login, the Overview is displayed.
There are now two quick start options for charging the vehicle:
- Access protection remains disabled, vehicle is charged without authentication, see Charging a vehicle without authentication (Free-Charging).
- Enable access protection and register the RFID chip, see Registering the RFID chip.
Registering the RFID chip
 DANGER
Risk of injury due to RFID sensor for persons with cardiac pacemaker or defibrillator
- If you use a cardiac pacemaker, maintain a distance of at least 60 cm from the RFID sensor on the front panel.
- If you use a defibrillator, maintain a distance of at least 40 cm from the RFID sensor on the front panel.
- Log in as a service user.
In the web app, select Vehicle management, Approved list in the navigation. - Disable Free charging.
- Select Add RFID chip.
- Hold up the RFID chip to the RFID sensor (5) on the front panel of the Wallbox.
- Wait until the RFID chip has been identified.
A beep sounds and the RFID LED (5) lights up green briefly as soon as the RFID chip has been successfully identified. - Give the RFID chip a name of your choice in the web app.
- Select Add to approved list.
The RFID chip is added to the approved list and is displayed as a registered chip in the Approved list screen.
Charging a vehicle with an RFID chip
![]() Prerequisite
Prerequisite
Charge level LED (2) is lit up white (no vehicle identified yet).
- Only for version with socket:
Plug the charging cable into the socket on the Wallbox. - Plug in the charging cable on the vehicle.
The charge level LED (2) pulses white (vehicle identification in progress).
The charge level LED (2) pulses yellow (waiting for authentication). - Hold the RFID chip up to the RFID sensor (5) on the front panel of the Wallbox and wait for identification:
A beep sounds and the RFID LED (5) lights up green briefly as soon as the RFID chip has been successfully identified.
When the charge level LED (2) is pulsing green, the charging process has been started successfully.
When charging is complete or the vehicle is fully charged, the charge level LED (2) is continuously lit in green.
![]() Further information
Further information
The Wallbox provides the following additional authentication methods, see operating instructions:
- Plug & charge
- Auto charge
- Approval by remote control
- Approval in the web app
When using OCPP, the backend operator’s server issues the charging approval remotely.
Additional information
 For the operating instructions, assembly and installation instructions, the full text of the EU Declaration of Conformity and other documents, see https://public.evse-manuals.com/volvo/index.html
EU conformity
eSystems MTG GmbH hereby declares that the following radio equipment types GHO22E202x*, GHO22E213x*, GHO22E223* comply with Directive 2014/53/EU.
*x may represent any letter.
The Wallbox is used for charging electric vehicles that comply with the generally applicable standards and directives for electric vehicles.
The Wallbox is suitable for stationary use indoors and outdoors and in private and semi-public spaces for operation within the defined electrical and environmental specifications.
Safety
To ensure safe operation of the Wallbox, observe the requirements for the target group and the intended use, along with the safety instructions for operation, see operating instructions.
![]() eSystems MTG GmbH
eSystems MTG GmbH
Bahnhofstr. 100
73240 Wendlingen
Germany
www.esystems.de
